Wednesday, July 15, 2009

Humid, Wet Weather Brings Tree Diseases

The humid and wet weather of spring and early summer has been ideal for the development of several woody plant diseases.


Fire blight, a bacterial disease, is rampant this year. It is commonly found on apples, crabapples, mountain ash and pear. Look for dark brown or blackened branch tips bent back into a “shepherd’s crook”. You might also find droplets of a creamy- colored liquid called bacterial ooze on infected stems.

This disease causes branch dieback and flower and fruit blight. At this time of year, cut out the affected branches about a foot below the visible signs of infection. Disinfect your pruning tool between each cut using a 10% bleach solution, disinfectant spray or rubbing alcohol. Fire blight can be spread on the blades of pruning tools and easily enters the plant through pruning cuts.
Fire blight is found on pome-forming (core forming) fruits of the apple family that include the plants mentioned earlier as well as roses, pyracantha and hawthorn. Similar shepherd crook damage is often observed on plums, cherries and apricots. Even though they are members of the rose family, they are stone fruits and in our area do not succumb to the disease. Look for other causes of this type of injury.


Sycamore and oak anthracnose fungal diseases are also common this summer. Infected leaves develop irregular brown leaf blotches. Leaves drop prematurely when the disease is severe. These anthracnoses may be confused with frost damage, scorch or leafminer injury depending on when the problem is first observed. If you have a hand lens of 30 power or more, you may be able to find telltale fruiting structures embedded in the darkened areas of the leaf undersides. If you’re not sure, contact the Jefferson County Plant Diagnostic Clinic at 303-271-6620 for assistance. See this fact sheet about anthracnose for more information.

Rake up leaves and dispose of them in the fall. Generally anthracnose diseases stress trees in situations where defoliation and re-leafing occur every year. Protectant fungicides should be applied in the spring at leaf emergence if this is the case. In drier years, anthracnose diseases are less of a problem.
Marssonina leaf spot of aspen has been brought into the clinic already. The fungal disease causes dark brown spots often surrounded by yellow “halos”. Spots may range in size from pinhead to larger blotches, where several smaller spots have merged together. Leaves may drop prematurely. Usually the problem is more of an aesthetic one than a plant health problem, although yearly premature defoliation stresses aspen.

Rake up leaves this fall. Trees may also be sprayed with a protectant fungicide next spring beginning at bud break. The disease is more prevalent and is found a bit earlier this year than normal due to the spring and early summer weather. See this fact sheet about foliage diseases for more information.


Anthracnose in Cucumber

Sunday, July 12, 2009

Lavender Tea Bread by Gardener Janet


I have heard about cooking with lavender, but I’ve never tried it. Years ago I saw a photo in a book called, “Herbs, Gardens, Decorations, and Recipes” by Emelie Tolley and Chris Mead, showing a delectable looking lemon tea bread. I had always wondered what would happen if I added lavender to that beautiful quick bread.


So this afternoon when the temperature dropped as an afternoon storm approached, I decided that it would be a good time to turn on the oven. I picked some fresh lavender flowers and started my culinary experiment.

Adapted from “Herbs”:

Lavender Tea Bread
Ingredients:
3/4 cup milk
2 Tbsp fresh chopped lavender flowers
2 cups all-purpose flour
1 1/2 tsp. baking powder
1/4 tsp. salt
6 Tbsp. butter, softened
1 cup sugar
2 large eggs
1 Tbsp lemon zest
Juice from 1 lemon
Powdered sugar

Grease a 9x5x3 inch loaf pan. Preheat oven to 325 degrees. Heat the milk with lavender almost to a boil, then steep until cool.

Mix flour, baking powder and salt together in bowl.

In another bowl cream butter and gradually add sugar, then lemon zest and eggs, one at a time, beating until light and fluffy. Add flour mixture alternately with lavender milk, in three parts. Mix until batter is just blended. Pour into prepared pan and bake for 50 minutes, or until toothpick inserted in center comes out clean. Let cool in pan 5 minutes, then remove to a wire rack to cool.

Make a simple sugar glaze with fresh lemon juice and powdered sugar. Add lemon juice to ¼ to ½ cup powdered sugar stirring until a thick but pourable paste forms. When completely cool, drizzle bread with sugar glaze. Garnish with sprigs of fresh lavender.

Looks beautiful….the taste is quite unique, and the aroma of lavender is very subtle. Fresh, and not too sweet. I think that it will be perfect with a tall, frosty glass of iced tea.

Saturday, July 11, 2009

Snow Peas in July by Heirloom Fan


As we all know, this has been an unusually cool and rainy spring. One good thing though is that my cool weather crops are hanging in there. We are enjoying a nice crop of snow peas – I planted them a little later than normal in May and then they recently seemed to like the right combination of rain and temperature and began blooming and producing handfuls of crisp pea pods. The variety I planted was Burpee’s “Snowbird”. The packet promised “large yields of edible pods” and they fulfilled their promise nicely. We have had some to eat ourselves, to share with friends and I may try to freeze a few bags for the winter.


Our lettuce and herb beds are also doing well. Some of the varieties that I planted that are still going strong include Burpee’s Buttercrunch, an organic small head variety, and a baby Romaine called “Freckles” (Lactusca sativa) which is a green romaine with maroon red splotches. This one comes from a seed company called Botanical Interests and is labeled as an heirloom. I also planted a mixed variety of loose leaf lettuce and it yielded some interesting types including a ruby red and an oak leaf type. I included some spinach which is mild and tender when picked young and included with the salad greens.

July is always the month for my garden to pick up speed and for the warm weather vegetables like tomatoes, peppers, cucumbers and squash to also begin an accelerated growth. The cool wet spring kept things growing but my tomatoes and cucumbers are finally blooming and setting fruit and I can see tiny Butterstick zucchini on the plants. So this is an exciting time for the garden. With the very warm weather predicted this week, we should be seeing some fast progress.

Now if we can just keep the hailstorms away!

Friday, July 10, 2009

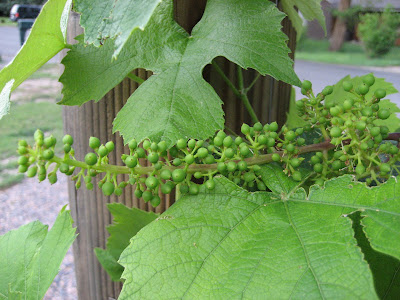
Growing Grapes for Winemaking by Donna Duffy


I’m lucky enough to live next door to a masterful grape grower, John Crawford, who always needs a tester for his wine. My husband and I cheerfully oblige. John’s a fourth generation vintner who has been growing grapes for about six years in Colorado, and making wine since 1979. John was previously co-owner of Colorado’s oldest winery, Colorado Mountain Vineyards – now Colorado Cellars. John’s private label is “Crawford Castle.” I recently interviewed John to see what I could learn and pass along about successful grape growing in Colorado. Here are some of his pearls of wisdom.

It’s often said that you can’t grow varietals (e.g. Cabernet Franc) at this elevation, just hybrids (e.g. Concord grapes). John’s experience somewhat bears this out – from six Cabernet Franc vines, only two are still alive. His most successful vines are White Marquis – a seedless hybrid, and Canadice – a seedless red hybrid. (Seedless grapes are best for making wine…but more about that later). This year John is experimenting with Traminette, which is similar to a Gwerztraminer grape, and Noiret grapes – hybrids zoned for Colorado.


Grape growing has a few hazards, including winter freezing. In mid-summer when the grapes are ripening, the vines must be netted all the way to the ground to keep out the birds. I’ve watched many a frustrated bird sitting on the nets, trying to figure out how to get to those tasty grapes. The squirrels seem equally perplexed.

On to wine-making! As a rule of thumb in Colorado, a healthy, mature grapevine will yield about five gallons of wine. Remember that equation if you decide to plant a bunch of vines: 20 vines could yield 100 gallons of wine. If all those vines were the same variety, they’d need to be harvested, crushed, de-stemed, and prepared all at once. Unless you have a large family or lots of friends willing to pitch in, fewer vines might be the ticket.

As a companion to grapes, John grows peaches, cherries, blackberries and elderberries – expanding the range of Crawford Castle wines for his lucky neighbors to taste-test.

If you are thinking about growing grapes, check out Colorado Grape Growers’ Guide. As John says, “the best way to make friends is to make wine.”

Thursday, July 9, 2009

Calibrachoa by Gardener Dave


In the last 2-3 years I have been looking for a “petunia substitute” that would require less maintenance (esp. deadheading) than the ubiquitous petunia. I like petunias for their mass color effect and their fragrance, but I don’t like having to continually trim off spent blooms, and I don’t appreciate their somewhat sticky nature.

Ergo, I have been replacing petunias with Calibrachoa (a.k.a. “Callies”, “Million Bells”, “mini petunia”, etc.) both for bedding and use in pots on my deck. Their blooms are smaller than those of most petunias, but they come in many colors and are “self-cleaning”, so no deadheading! I will share my Calibrachoa experiences here with you and would welcome your own experiences and advice as well. They are still somewhat pricey and not as universally available as petunias, so extra care may be warranted to avoid having to replace/replant them if they don’t make it in your garden for one reason or another.


Firstly: some of the cultural advice I have read claims they are drought resistant. My experience tells me that here they need good well-drained soil and constant moisture, but avoid constantly wet soil. Curiously, if their little leaves begin to curl and wilt, the flowers may stay open and still be vividly colored, but the plant will not recover. Secondly: their stems are rather woody and thin and subject to breakage from handling and wind. I mulch them with shredded cedar bark and try to immobilize the longer stems to prevent wind whipping. Thirdly: they are much adored by slugs, so keep the slug bait handy! Some cultivars are more vigorous than others, some more creeping, some more wiry and bushy. Many are sold in hanging basket arrangements.

Other than those few concerns, I still like the “little fellers” for their generous sun-loving blooms from planting time to after light frosts in the fall, and for their clear bright colors and “enthusiasm” when you treat them right. Give them a shot of fertilizer now and then as you would petunias, and they don’t ask for much else (except no hail please!).

Curiosity overcame me, so I searched the net to see if I could find where their hard-to-remember and hard-to-spell name “Calibrachoa” came from. According to Marsh Botanic Gardens at Yale University, some botanists include them in the petunia’s genus, Solanaceae, and others separate them into their own Calibrachoa genus, named for an 19th century Mexican botanist and pharmacologist, “Antonio de Cali Bracho”.
The more modern version called “Million Bells” was developed by the large Japanese corporation, Suntory (Yes, they also make whiskey) Interesting!

More info on them, including care and even their propagation, can be found at the following site:

gpnmag.com

Cheers,
Gardener Dave

Wednesday, July 8, 2009

Wild About Wildflowers Part II by Gardener Cumax


Remember those cute adorable seedlings from 2 months ago? They've blasted from the soil to orbit their flower heads about 24" up. The annuals that is. Still green but in need of sunlight from the towering bachelor buttons lie some seven perennials. As predicted, when sowing annuals and perennials at the same time, annuals win out. Still be determined: if the perennials come back next year. To ensure that they will, I'm pruning back these buttons. I would pull, but everything is so tightly packed that I'll be yanking the perennials as well. In this 16' x 2' long "living mulch" I estimate there are about 500 Bachelor Buttons. I'll be happy to cut away half of them. But the gardner snake won't; s/he loves in down there.

Here's what they looked like in the spring.

Wild About Wildflowers

Tuesday, July 7, 2009

Master Gardeners' Garden Tour 2009

If you missed the 2009 Master Gardener Garden Tour, perhaps you will enjoy the photos Gardener Kim took.

Friday, July 3, 2009

Baked Rosemary Risotto by Gardener Janet


The frenzy of spring planting is waning. The gardens are cleaned out and new perennials stuffed into available spaces, patio plants are bursting out of their pots after the second or third application of fertilizer, it is finally time to relax a bit and enjoy the fruits of our labors.

A pillar of Tuscan Blue rosemary sits in a pot next to the cushioned seat where I read the paper. As my arm grazes its pungent leaves, I loose track of the news and start to think about we could have for dinner.

How about grilled salmon, a nice salad with mixed greens, fresh basil, tomato and buffalo mozzarella, and maybe rosemary risotto? I use a recipe for baked risotto that is much less time consuming than traditional recipes. It is drier and has a firmer texture, but for easy summer meals or entertaining, it can’t be beat.

Baked Risotto

Preheat oven to 400 degrees

Ingredients:
3 ½ cups chicken broth
2 Tbsp chopped fresh rosemary leaves
4 Tbsp (1/2 stick) butter
1 onion, minced
2 cups Arborio rice
3 tsp crushed garlic (or 3 minced garlic cloves)
½ cup dry white wine
2 oz (1 cup) grated parmesan cheese
Pepper

Bring broth and rosemary to simmer in a medium saucepan over medium-high heat. Cover and keep the broth warm over the lowest possible heat.

Melt butter over medium heat. Add onion and cook until lightly browned, about 9 minutes. Stir in the rice and cook until the edges begin to turn translucent (about 3 minutes). Stir in garlic and cook until fragrant (about 15 seconds). Add the wine and cook, stirring frequently until it is completely absorbed (about 2 minutes).

Spread the rice mixture into a 9 x 13 inch baking dish. Pour the warm broth over the top. Bake until the rice is tender and the liquid is absorbed (about 25 minutes).

Stir in parmesan. Season with salt and pepper to taste.

Substitute the rosemary with sage, oregano, basil, or other herbs to serve with other main course dishes.

Back to the paper…..

Monday, June 29, 2009

Pots “R” Us (In special places) by Gardener Dave


There were a couple of problem areas in my yard where nothing seemed to grow well. I didn’t want to put a lot of work into them for reasons which I will explain. One location is in a far corner with a utility pole in it. The grade there is already a bit higher than my neighbor’s and would require a preliminary dig-out to put in a raised bed so as not to harm the fence. However, I kind of like the way my yard slopes gently up to that stage-like corner. The other reason for not putting in an extensive/expensive raised planter bed there - the plants would get pretty well destroyed if the “Power to the People” (Xcel) crew decided that major work is needed up the transformer pole, or (heaven forbid) the pole needs replacing. Since the corner was slightly elevated, I decided to put some “characters” on my little stage in the form of graduated-size terracotta pots. These I plant with annuals each spring. This year I put a row of Calibrachoas in front of the pots. The pots are filled with moisture-retaining potting soil and everything is watered by drip irrigation so maintenance is pretty much just fertilizing and a bit of deadheading. In the late fall I remove the annuals, let the pots go dry, and cover them with plastic to keep the soil dry so it doesn’t expand and crack the pots. If the Power People need to work there, at least they won’t be destroying perennials or an elaborate raised bed, and the pots can be moved.


The other problem area was below my deck in one end of a brick planter that was built at the same time as the house. It gets no direct sun. The light source there is primarily reflected light off the concrete driveway. This seems to be adequate for Impatiens and a few other shade plants. It looked bad, so I decided to give it the “graduated size pot treatment” also. There was room for only three “sized” pots, which I planted with New Guinea Impatiens, “Can Can” Coral Bells (Heuchera ‘Can Can’), and a “Little Lantern” Ligularia (Ligularia x hessei ‘Laternchen’) which I have not tried before. So far they all seem to be happy there. I wish I had a “before” picture to show you, as it’s like the expression “You Had to be There” to see what it was like originally, with Oregon Grape Holly trying to extend itself into those shady conditions from the middle of the planter. It got tall and lanky and very weedy-looking. Needless to say, it is no longer there. Good riddance!

Cheers,
Gardener Dave

Saturday, June 27, 2009

Mulching Around Trees

There is a very simple way to mulch around trees without killing the grass with glyphosate, digging up sod or using landscape cloth or plastic to smother the grass. Use newspaper instead! Four to six pages of newspaper with mulch on top will effectively kill the grass. Your trees will love not having to compete with grass for nutrients and water and the newspaper will decompose and continue to feed the tree. Newspapers use soy-based inks so there is no fear in harming the earth!

See how easy:


And voila! Ten minutes later:

Wednesday, June 24, 2009

Garden Problem Spots – Invasive Roots from Older Trees and Shrubs by Gardener Dave


I am soliciting some advice from you other blogging gardeners. My yard has several areas where I would like to plant perennials, but invasive, wide-spreading feeder roots from existing older trees and shrubs make new planting difficult and rob the soil of moisture and nutrients. These are areas that are 5-10 feet or more from the main tree trunks or shrubs. Some areas are shady, some are sunny.

I have had some success in recent years with making a couple of raised flower beds in these areas, covering the original existing soil and the inside sides of the wood bed material with high-quality woven weed barrier before adding improved planter soil. In one, I doubled the layer of weed barrier before adding soil. The raised beds are 12-14 inches high. They are planted with perennials in the back and center, leaving the front edges open for annuals.

Since my weed barrier is quite permeable to water and oxygen, I believe I am doing the existing trees and shrubs little damage, since the beds are watered regularly and the bed soil is quite light and porous, similar to standard potting soil. Also, the beds do not cover a large portion of the tree/shrub root area. Water, even heavy rain, seems to drain easily through both the soil and weed barrier. So far (in 2-3 years), the perennials seem to thrive in this environment, and the original tree and shrub invasive root problems seem to be alleviated. Whether the weed barrier will stand up to them long-term remains to be seen.

What I am wondering is: In your experience, are there many common herbaceous perennials that require a root depth of over 12 inches to attain healthy maturity? I have “Googled” to some extent to determine this, but would welcome your experiences and knowledge in this area. Thanks!

Gardener Dave

Tuesday, June 23, 2009

What to do with the side yard? by Donna Duffy


Have you noticed how narrow side yards have become in newer neighborhoods? They are usually covered in rock and serve only as a pathway from the front yard to the backyard. In older neighborhoods, like mine, side yards are typically wider and offer more options for development.

But what to do with the side yard? It has the house on one side, and often a fence on the other side. It’s usually a shady area, and can be full of tree and shrub roots. It’s a high traffic area, resulting in compressed soil. It’s one of the more challenging parts of the yard for many of us.

When we moved into our house, the side yard had a shed, a locust tree and some spotty grass. I left it that way for a summer or two, then decided it was a waste of water to try and nurture the grass. So I killed the grass and put wood bark mulch in its place. Well, that took care of the water waste, but it was pretty boring. So one summer, I decided to take on the side yard as my main project. I added a meandering flagstone footpath, several large planters, a volunteer sumac, and a hammock under the tree. I planted perennials in the planters, not sure if they would last beyond the first year. At the entrance, I put an greenish metal arbor and gate.


It’s now an interesting, maintenance-free walkway. The perennials have survived in the planters with minimal winter water. The tree drops its leaves on the mulch, and I don’t have to rake them up. It’s a great place to hide out and take a nap in the shade. In the backyard, I continued the flagstone pathway in the lawn all the way to the pergola. For not much money or effort, I solved my side yard dilemma.