
Winter sowing is a method of starting seeds outdoors in winter. This method takes advantage of natural temperatures. You will not need to refrigerate seeds to satisfy cold stratification. Winter sowing involves sowing seeds in an enclosed container outside during winter, allowing them to germinate in spring.
What are the advantages? It’s simple to do. It’s effective. You don’t have to start seeds indoors or invest in a lot of expensive equipment. It allows someone who doesn’t have the room, nor the space available indoors to start seeds. Winter sown seedlings are hardier. There is no need to harden off the seedlings as they are acclimated to outdoor conditions. They are ready to plant whenever the outside temperatures have sufficiently warmed and they are the right size (2-3 inches or two sets of real leaves).
What can you winter sow? Native plants, perennials, herbs, annuals, vegetables. (start after the winter solstice, Dec. 21) first because they require 4-6 weeks of cold stratification.
When to winter sow? After the Winter Solstice (December. 21st), January to February is good. Native plants and perennials will not need cold stratification. Annuals and vegetables can be sowed through April. Frost-tolerant flowers and vegetables such as petunias, cosmos, kale, broccoli, spinach, and brussels sprouts successfully withstand the cold temperatures of early winter. Frost-sensitive species such as zinnias, tomatoes, and squash need to wait until the warmer temperatures of March or April before sowing using this method.
How do you winter sow? To begin, create your miniature greenhouse from recycled plastic containers. Milk jugs that allow light to penetrate work well. Experiment with the recyclable containers you have on hand. As long as it holds 3-4" of potting soil, with a little headroom for the seedlings to sprout and grow, you're good to go!
 |
| Graphic courtesy of Skycrest Studios |
Because the containers will collect snow and rain, add drainage holes in your mini-greenhouse. With a drill or utility knife, cut several holes into the bottom of the container. Cut around the milk jug below the bottom of the handle, without cutting the top of the container all the way off. Leave about a half an inch intact just below the handle. This section acts as a hinge to hold the container together.
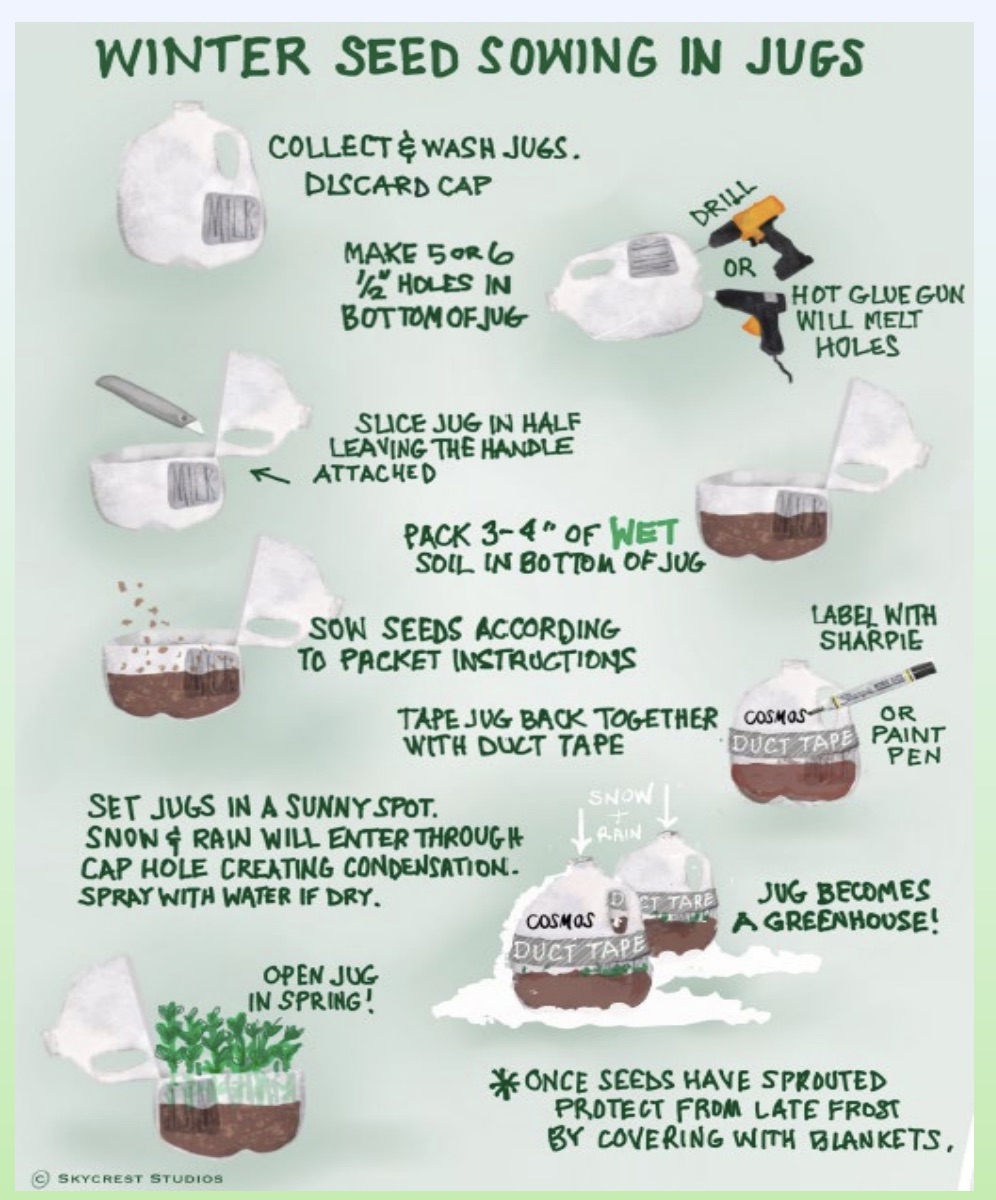 |
| Graphic courtesy of Skycrest Studios |
Next, fill the bottom of the miniature greenhouse. Moisten the soil and allow it to drain. The soil should have a moisture level like a damp sponge. Light and fluffy soil that drains well works best.
The container is now ready for seeds. Small seeds can be left on top of the soil, however larger seeds require more attention. Follow the instructions on the seed packet for planting depths of larger seeds. Make sure there is good contact between the seed and the soil. Replace the lid and secure with duct tape. Throw away the cap. Label the container with the date and the type of seed planted. Your small greenhouse container is ready to go outdoors. While the mini-greenhouses should receive sunlight and have exposure to rain and snow, they should be placed in an area that is safe from strong winds, people and animals.
The temperature variation prepares the seeds for germination at the proper time. It may be necessary to add a little water during warm weather spells in the winter. One easy way to check if the container needs water is to pick them up and see if the soil is wet or heavy; if not add a little water. When the days begin to warm, seedlings will emerge. After emergence, open the container on sunny days, but close it at dusk to protect the seedlings from cold night temperatures. The seedlings naturally harden off and can be transplanted when soil temperatures reach proper levels. Cut flaps along the side of the miniature greenhouse to slide seedlings out. Divide the clump into pieces and plant as you would a store variety.
Sources/Resources:

